

How to use VNET Plus:
Registration of a VNET user:
When using VNET Plus, the representative of users should register the VNET user name and password from the VNET registration screen.
The registered VNET username will be used later as part of the VNET ID (subdomain name).
If the VNET user name has already been acquired by any other person, an “attention” message will be displayed, and you have to specify a different name.
Definition of VNET ID and communication group:
VNET users can define VNET IDs and communication groups for end users.
A different and independent network is constructed for each VNET user.
It is not necessary to worry about interfering with other VNET users' networks.
- VNET users should click Login at the bottom of the page to access the login screen.
- Enter your VNET user name and password from the login screen to log in.
- From the administrator screen, register the VNET ID, password, and communication group name of the communication device used by the end user, and define the communication group.
- The VNET user notifies the end user of the VNET ID and initial password.
Installation and Execution of VNET Plus:
- The end user downloads the VNET application of the corresponding OS from the VNET download site and installs it on the communication device (*).
- When the installation is completed, an icon will be displayed. Click it to start.
- Enter VNET ID, and password on the displayed screen.
- The end user should change the password so that he/she can use his/her own password from the next time. If you instruct random number generation when generating a new password, you can link the VNET ID with the device.
- By pressing the login button, user authentication is performed and preparation for communication is completed.
- Start up the other party's communication device in the same way.
(*)VNET Plus uses YogaDNS to hook DNS requests(yogadns.com).
After installing VNET Plus, you have to install YogaDNS as well.
Preparations for VNET Plus are now complete.
Try to communicate in the same manner as LAN communication.
When accessing the Web server from the client,just replace the server name part in the URL field of the client browser with the VNET ID.
Please note that if the communication group defined by the VNET user are not the same, they will not be able to communicate with each other.
Even if the other party is on the same LAN or in a remote place over the Internet, communication can be performed in exactly the same way.
Also, even if you switch networks during communication, communication will continue.
Security is perfect, so you can use it with confidence.
Related video:
Setting up for VNET Plus with English subtitles.10 minutes. User registration, definition of VNET ID and communication group, installation, startup method.
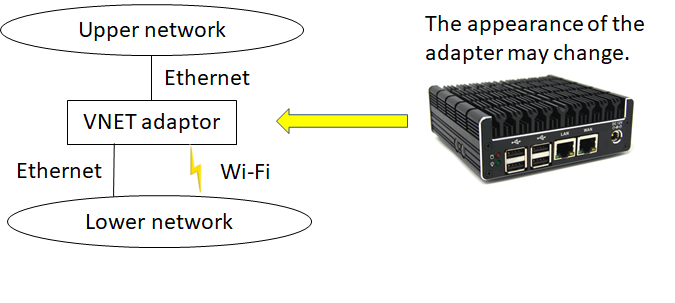
How to use VNET Plus Adapter:
The VNET Plus Adapter set on the side of the device not capable of installing VNET Plus for some reason takes over the functions of VNET Plus.
The VNET Plus Adapter is also given a unique VNET ID.
A total of 32 servers or clients can be connected under the adapter (lower network in the picture.).
Also, up to 4 servers can be registered in one VNET adapter.
Related video:
How to use VNET adapter6 minutes. How VNET adapter works, Usage examples, connection method.
How to get the VNET adapter?VNET adapters can be obtained in two ways:
(1) Purchasing the SD card of Raspberry pi4 (64bit)
You can purchase an SD card that incorporates the VNET adapter function.
The user must prepare the Raspberry pi4 itself.
In this case, the lower network is limited to Wi-Fi connections.
(2) Purchasing a VNET adapter
You can purchase the hardware for the VNET adapter.
Please contact us by email for how to purchase.
Usage notes
In many cases, VNET can be introduced regardless of the surrounding circumstances, but it is necessary to pay attentions to the following special environments.
All of them are rare cases, but I will list the points to keep in mind.
① If a PC with VNET installed (let's call it A) has multiple network interfaces, such as Ethernet and Wi-Fi, and both are used at the same time, A cannot achieve the mobility function. Please use such a PC in an environment where the network is not switched.
② When there is VNET device B communicating with A above, communication cannot be continued if B switches the network. Please note that this is a possible situation if B is a smartphone.
③ If there are multiple PCs with VNET Plus installed (assumed to be C and D) in the lower network of the VNET adapter, VNET communication between C and D is not possible because the lower network of the adapter is for plaintext communication area. General communication is possible.
④ If an application that handles DNS queries is installed on the PC (for example, AdGuard: an application that blocks Youtube ads), it may not be possible to send VNET packets due to conflicts with YogaDNS used by VNET. In the case of AdGuard, conflicts can be avoided by turning off the DNS setting, which is an optional function.
⑤ When AD restarts for some reason, it is necessary to re-login for AD from all TSs and ENs. EN includes VNET adapters. This is because the sequence number is included in the VNET communication packets for security reason, and it is necessary to reconfirm the consistency of this value. In the unlikely event that AD restarts, all VNET users will get the fact by email.
⑥ If the network has a multistage NAT configuration and there are multiple lower NATs, the network addresses under the lower NATs must have different values. If the network address is the same, there is a possibility that the same IP address exists, and AD cannot distinguish between the two in a multistage NAT configuration.
⑦ Users who have been using YogaDNS independently from before cannot use VNET Plus as it is because VNET uses some of the functions of YogaDNS. In this case, coexistence is possible by adding the conditions for using VNET Plus to the settings of YogaDNS. Please contact us for such cases.
⑧ The videophone that is currently built into VNET Plus as a service does not have the mobility function, so if you move during communication, the call will be disconnected. A videophone with the mobility function is under preparation.
-
-
VNET Plus Support Center:
Iwate Digital Systems Company Limited
〒020-0066 1-11-29 Ueda, Morioka City, Iwate Prefecture, Japan (NF Building, 2F)
Tel: +81-19-681-8581
Email: vnet-support@iwate.ds.jp CONTENTS